
King Schools - Review 3
Private Pilot Knowledge Test Course
Flight Instruments
By Farmboyzim

For some background on what this review is going to be dealing with click HERE.
In this third review in a series of many, we will be talking about Flight Instruments and how they work. In most General Aviation aircraft, the instruments are set up in fairly the same manner, to keep a consistent, from one aircraft to another.
Gyroscopic Instruments
The Attitude indicator, Turn indicator, and the Directional Gyro, also known as the Heading Indicator all operate on the principle of gyroscopic rigidity in space. A spinning top will maintain its place in space as long as no external forces are applied to it. As a kid, we had a toy top called a "whizzer", or something like that. You rolled the pointed end on the floor, and got the inside gyro spinning real fast. Left alone, this top would stay spinning upright until it ran out of juice. If you held it in your hand, and tried to move it about, you could feel the force that it was exerting. "Precession" or turning occurs when this external force is applied to the top, or rather, the gyroscope inside of the "whizzer", and the force that you feel is the reaction that is occurring as though the force had been applied to it from a point 90 degrees away from the direction of rotation. Sounds more complicated than it really is.


A Pitot Tube
Airspeed Indicator
Attitude Indicator
Altimeter
Turn Coordinator
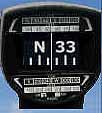
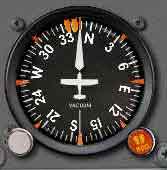
Heading Indicator
Vertical Speed Indicator
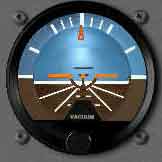
The gyroscope and its associated linkage, cause the horizon disc to move in the directions of pitch (up and down) and roll (tilt of the wings) behind the representation of the miniature airplane. When you bank, pitch up or down, and compare the real horizon with what you see on the indicator, you'll see that it instantly and accurately reflects the changes in pitch and roll.
The Attitude Indicator is THE most important instrument that is on the panel when you have lost visual reference with the natural horizon. In other words, blind as a bat! The white tic marks you see on the gauge, around the outside edge are degree of bank markings. The top center is zero bank angle, wings are level. Going left, the next tic mark is 10 degrees bank, then 20, 30, 60, and 90 degrees of bank. Right in between the 30 and 60 degree marks, is 45 degrees, a "steep bank". If you're hitting the 90 degree mark in a Cessna 172 or an aircraft of equivalent
performance, let me just say you're braver than I, or.....? That screw head is just about where the 45 degree mark would be. When your visibility is poor, keep the miniature wings (the red lines) near the solid white horizon line. In these "blind" conditions, don't bank more than 10 degrees. That's the first white tic mark. A little side note here on the Attitude Indicator. When you are flying in level flight (check your vertical speed indicator for a "0" climb reading) you can adjust the position of the artificial wings by using the knob located at the bottom of the gauge. Make sure you are truly in level flight though.
Heading Indicator
Heading indicators are instruments that are used to tell you which way you are heading, obviously. However, they can't be trusted. It repeats the heading that's set into it. That's why it has an adjustment knob, and must be set to either the magnetic compass heading, or if you're sitting on the runway, set it to the runway heading. Runway numbers reflect the magnetic heading that they are aligned to. Failure to pay attention to this small but extremely important detail can result in course deviation of many miles. While in flight, remember to check the heading indicator against the magnetic compass every 15 minutes. More often if your indicator (actually the gyro inside that spins at about 18,000 rpm's) starts to show signs of age. Wear on the gyros bearings will, over time, cause it to precess, or drift, away from the heading that you have set. The only proper time to reset the heading indicator is when you are in unaccelerated, straight and level flight. Deviations occur in the magnetic compass during banks, climbs, and ascents.
Magnetic Compass
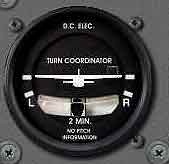
Turn and Slip Indicator
There are a couple variations of this instrument, but they work in the same manner, and have a "ball" instrument included. Again, note the white tic marks. This instrument will indicate the rate of turn of the aircraft. When the wings of the indicator are on the tic mark indexes, you'll be turning at a rate of 3 degrees per second. A complete circle, or 360 degrees, will take approximately 2 minutes. The two indications that this instrument displays are rotation around the yaw axis, (the ball), and the roll axis, (the miniature airplane). The ball indicates the how well the turn is being set up. In other words, use of the rudder during a turn will keep the tail going in the same direction as the nose, keeping the plane from "skidding" through the air, and this is done with the help of the ball, by keeping it centered during your turn. It's like a car taking a turn too fast and "fish-tailing".


www.farmboyzimsflightsims.com
FBZFS
A "Neck Tie"
Pitot Static Instruments
The airspeed indicator, altimeter, and the vertical speed indicator are all pitot static instruments. The pitot static system consists of a Pitot tube, which is a pressure sensing device and in the case of most small aircraft, is located under the wing, a static, or "zero' pressure source, located where the aircraft's motion through the air will create no pressure at all, usually on the side of the fuselage, and all filters and connecting tubes. These instruments measure the changes in pressure in relation to the aircrafts vertical and horizontal movements in the atmosphere.
The airspeed indicator is the only instrument that uses input of air pressure from the Pitot tube.
The airspeed indicator reads the difference in pressure between the "impact" air hitting the Pitot tube, and the still air readings from the static pressure source. It is vitally important to make sure that these systems remain clear from any blockage, or else your systems will be rendered useless.
Altimeter
Heading Indicator
Turn Coordinator
Attitude Indicator
Attitude Indicator
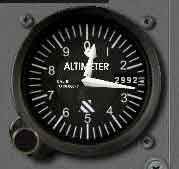
An altimeter is basically a "dry" barometer that reads feet above sea level. The input for these readings comes from the static port.
To read an altimeter is really quite easy. The smaller hand represents 10,000's and the larger hand represents 100's. Read the values of the hands individually starting with the 10,000's, or the smaller hand. If it falls in between a number, call it the smaller number. In the picture at the right, you would consider the reading of the smaller hand as "0". The altitude indicated here reads 265 feet. If the small hand was right on the 1, and the big hand still sitting where it's at, the reading would be 10,265 feet.
You would normally think that altitude is the same wherever you might be. These are the
thoughts of those that don't fly! There are four types of altitude that you must be aware of, and they are:
Indicated Altitude - Is what your altimeter reads.
True Altitude - The vertical distance of the aircraft above sea level.
Absolute Altitude - The vertical distance of the aircraft above the surface.
Pressure Altitude - The altitude indicated when the barometric scale is set to 29.92. On a standard day, the weight of the atmosphere will support a column of mercury (Hg) 29.92 inches high if you were standing with your toes in the surf, otherwise known as sea level.
Altitude Operation and Errors
Your altimeter setting is the value at which the barometric scale of the altimeter is set so that the altimeter will indicate the true elevation of the airfield. The controller will pass this info on to you or you can obtain it from any charts of the airport that you may have. When the altimeter is correctly adjusted, this is a case where indicated altitude equals true altitude. The other instance of this is when at sea level with standard conditions.
So, you out there in the great blue yonder, and you happen to be flying in an area of high pressure, and you're maintaining level flight. After a while, (if you haven't been keeping tabs on the weather BEFORE and DURING your flight) you fly into an area of low pressure, and you fail to make the necessary adjustments to your barometric setting. The altimeter is going to give you a false reading that says that you're at a higher altitude than what you are actually at.
On the other side of the coin, if you are just as unaware of the weather situation as the fellow in the example above, and you fly from an area of low pressure into an area of high pressure, while maintaining level flight, your altimeter is going to give you a reading that is actually lower than your actual altitude at sea level.
Most General Aviation aircraft are not outfitted with radar altimeters, which will give you an above ground level (AGL) reading. I haven't priced the avionics personally, since I have no plane in which to install them! But I would imagine a rig like that is not cheap! You have to maintain awareness of the weather patterns in the areas that you are fling in. This should all be a part of your pre-flight brief.
Barometric Scale Reading
29.92
Adjustments to the barometric setting can be made with the use of the adjustment knob, located on the lower left of the gauge. Here's what happens when you change the settings. When you adjust the setting in the window from a smaller number to a larger number, the hands on the altimeter will show an increase of approximately 1,000 feet indicated altitude for each inch Hg adjustment in the window. To use the example in the King's Private Pilot Knowledge Test Course Book, if you set the barometric window reading from 29.15 to 29.85, the altimeter reading will increase by 700 feet. Here's how we did this:
29.85" Hg - 29.15" Hg = 0.70" Hg
0.70" Hg x 1,000 ft/inch Hg = 700 feet
If you want to know what your pressure altitude is, just set the barometric reading to 29.92 and read the pressure altitude indicated on the altimeter gauge.
Temperatures also have a significant effect on the altimeter readings. On one of those beautiful warm summer days, the pressure levels are raised and your indicated altitude is lower than your true altitude. In other words, this happens when the air temperature is warmer than standard. If the air temperature is colder than the standard, your true altitude will be lower than your indicated altitude. A very hazardous situation indeed. Once again, be aware of the weather before leaving the ground!
Magnetic Compass
If your external power source failed, the one and only thing that would still work would be the Magnetic Compass. Although, you may at this point have other things on your mind, like, "why did that happen?"!
Navigational procedures are based on magnetic information. But beware! the magnetic compass is subject to more errors than any other instrument on board! The magnetic compass is only accurate during straight and level flight.
Acceleration and deceleration errors in the Northern Hemisphere occur only on easterly and westerly headings. If you're heading either north or south, acceleration/deceleration will not have any effect on the compass. As an example of this, if you had or have one of those dashboard mounted compasses in your car, and while at a full stop, you see that the floating disc reads North.
Visualize that disk floating there. Whoever is driving steps on the gas and you see that the compass still reads north, but the disk has tilted back off its pivot point. Same deal if you were heading south. Now that you have that idea in your noggin', let's hop back into the plane. We're flying along on a westerly course at level flight and an even speed. You need to increase speed a bit, so you apply more throttle and you notice that your compass is turning towards the north, but you know that you're flying straight and level, just faster. Don't worry, the compass will "catch up" and correct itself once your speed is at a maintained level. Same thing happens if you're heading east. This is called Acceleration Error.
What about if you slow down, or decelerate while heading east or west? In this case the compass will indicate a turn towards the south. This is called Deceleration Error. An easy way to remember these rules is this:
ANDS: Accelerate North Decelerate South
Compass Dip Errors occur in the Northern Hemisphere when you're heading north, and you start a turn in a different direction. the compass will momentarily indicate a turn in the opposite direction. So if you're heading north and you turn towards the west, the compass will indicate a turn to the east. Turn east and it will indicate west. After you stabilize your turn and level out, the compass again, will catch up. NO: North Opposite.
External Forces will cause Magnetic deviation errors in the compass. The metal of the plane (steel) and wiring will cause deviation. All the more reason to stay on top of your location while flying VFR with your charts, using speed, time, and what you see outside in relation to what you see on your chart.
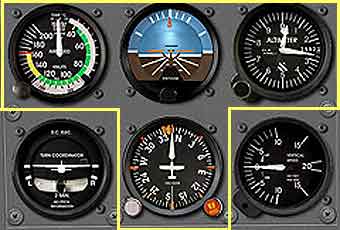
Here's a graphic of what the standard layout of the six gauges that are common to just about all aircraft, in one form or another. In most GA aircraft, this layout will more than likely be identical from one aircraft to the next. Outlined in yellow is the "T". These are the instruments that deserve most of your visual scan time on the panel.
I hope this was helpful for you as much as it was for me! The next installment of the King Schools Private Pilot Knowledge Test Course will cover Sectional Charts.
45
Thanks For The Visit !