

www.farmboyzimsflightsims.com
FBZFS
Thanks For The Visit !
First and foremost, I AM NOT A FLIGHT INSTRUCTOR! These tutorials are written for flight simming only, and even at that, they're not too technical! I'm going to give you just the basics, and in this tutorial, we're going to do an ILS landing at my home airport of KSTS, Santa Rosa, California, USA. ILS landings are a very safe way to get your aircraft onto the ground, and they do take practice to perfect, but they're not as hard to do as you think! Just as a reminder to you, there's some great interactive tutorials right there in MSFS 2004 on this, and other topics. These tutorials are basic and I really don't go into a great amount of detail, just enough, I hope, to convey the general idea! Besides, it's fun stuff to write about!
Instrument Flight Rule Approaches
The Instrument Landing System (ILS) Approach
I know that you must be thinking, where's the tutorial on VFR approaches? Well, I haven't written one yet! That will be next up. Don't ask me why I'm doing it bass ackwards, but if you must know, I ended up taking a bunch of screen shots for the idea I had for the ILS tutorial, and once I had them all edited and arranged nicely, that's when I realized the topic of VFR approaches was missing from the list! Soooo...Since I have the pics ready and the text ready, this one's coming at you first!
There's more to IFR approaches than there is with VFR approaches, to be sure, but this type of aviating will put your behind on the ground safely if inclement weather and bad visibility happens to be a problem! That is, of course, if the airport/field that you're flying into has IFR Approach capability.
IFR Approaches come in two categories; Non-Precision and Precision. Non-Precision Approaches include VOR, NDB and GPS and do not provide an electronic glide slope. Precision Approaches include ILS (which is the topic of this tutorial), MLS (Microwave Landing System), which is used primarily by private companies, and PAR (Precision Approach Radar) which is used by the military.
You can perform an ILS Approach's in a wide variety of aircraft, from small to large, if they are so equipped with the appropriate navigational gear. We're going to start out small, and for this tutorial, I will be flying the Cessna 337 Skymaster (Click Here to DL), a great Freeware model, and one of my favorite GA aircraft. The panel and gauges are the same as can be found in the Cessna 172, and function in the same manner. The 172 is a good one to start out with if you're still a bit new to approaches and landings. For this tutorial, I'm going to assume you know the basic panel layout and how to tune the radio. Tuning the Nav freqs is done in the same manner as tuning the Comm freqs.
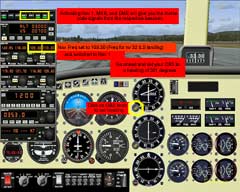
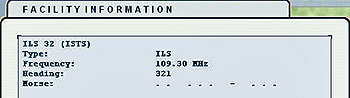
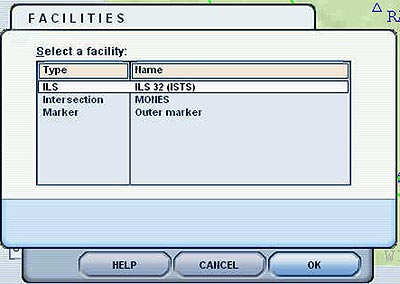
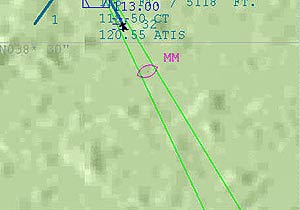
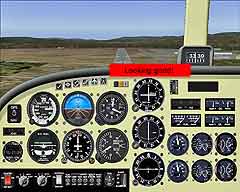
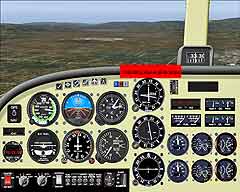
We're going to do an ILS landing at my home airport of KSTS, Santa Rosa, California, USA. OK, a quick refresher on the VOR Display and tuning the Nav freqs into the radio. In the image at left, you will see the Nav Freq and the OBS setting knob outlined in yellow. The VOR equipment can aid you in navigating, by tuning in the active ILS runway frequency on the Nav Radio, setting the ILS course on the gauge using the knob marked OBS, and watching the "swinging lines", which are actually called Course Deviation Indicators (CDI), to guide you to an intercept of the localizer (side-to-side) and the glide slope (vertical) path to a picture perfect landing! CDI swings to the left, you need to fly to the left. CDI to the right, fly to the right! Do this until the CDI that is up and down (your localizer needle) lines up with the set guide line on the indicator. You're lined up with the runway! Take this one step further, where you have a CDI that runs from side to side on the gauge and follow it's directions to catch and stay on the ILS glide path (vertical) into airports that have ILS capabilities. The image at left has some notes on what to do for frequency set up and VOR tuning. To find the frequency for an ILS approach, go to the Map view, click on the runway that you wish to use and then click on the items that you want more info
on, such as frequency and heading for an ILS arrival. It's also helpful to have charts of the airport that you will be arriving at, and these happen to be called Arrival Charts. They are loaded with important information that you need to know to perform these approaches properly.
Not for real-time aviation use!
Click chart for larger view
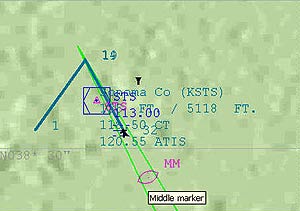
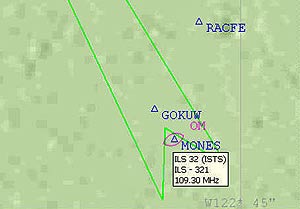

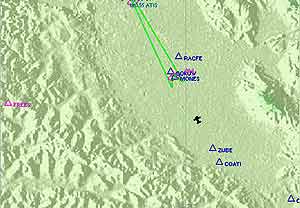
The chart at left has all the info you're going to need to make an ILS approach and landing. We're going to focus on the basics of heading, altitude, watching the CDI's and getting her down. You can pursue this topic in more detail from the MSFS 2004 tutorials. I've marked the areas of importance in corresponding colors so you can match up the two views, top down and the side view, on the chart more easily. With the KSTS ILS RW 32 Approach, you enter it to intercept the glide slope at 3000 feet, on a course of 321. Don't forget to set the course using the knob marked OBS to 321! The VOR dial will rotate. Enter the pattern on course and at correct altitude, and through the use of power and flaps, maintain your glide path by following the CDI's.

In the chart above, the yellow circle denotes the point at which you enter the pattern. There are a set of three indicators on your panel, that is, if your aircraft is so equipped, that will light up and indicate when the outer, middle, and inner markers have been reached. In the panel images to the left, they are three squares of different colors, and sit at the upper left of the VOR gauge. The letters "O", "M", and "I" are displayed on these indicators. The green circle indicates the outer marker and the red, the middle marker. The indicator lights will light when each marker is reached, respectively. In both the chart above and the image taken from the Map View in MSFS 2004 at right, you can see a long, arrow shaped pathway indicator. This is the approach path that you
must intercept. In the above chart, you will notice that at each of the markers, you must be at a certain altitude in order to stay on the glide path. During this time, speed and altitude and attitude are the things that you want to pay attention to. Get the right combination of all three and the aircraft almost lands itself! Almost!
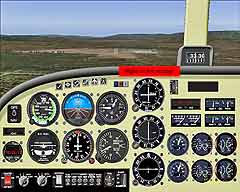
Click on the panel images at left to see what the CDI's are looking like at different parts of the approach. As you can see, at the beginning of the approach, my localizer CDI (side-to-side) is lined up, but the glide path CDI (Up and down) indicates that I have to drop down a bit to intercept the glide slope. It is an accepted procedure to capture the glide slope from below, that is, not droppoing down (as is shown in the image!) to capture the glide slope. The arrow represents the area that you must be in for interception of the localizer.
Flying ILS approaches are a lot of fun and they can be as challenging as you want them to be. Set your weather so
that the cloud coverage doesn't break until you're say, 1000 feet above the field, and be prepared for an eye-opener of a landing! When the field pops into view after looking at nothing but your gauges and the grayness of the clouds, you do one of two things...if all went well with the approach; you breathe a sigh of relief, as does your passengers! If all did not go well, and you pop out of the clouds not in the right place at the right time, well, breathing a sigh of relief MAY come later!
There's more to landings than was covered here, such as the proper entry patterns, contacting the ATC, getting info from the ATIS on weather, etc., but that stuff will provide me with more exercise for my fingers in future "mini-tutorials"
For quick set-up approach runs, you can go to the Map view and click and hold down the mouse on the aircraft icon, move it to a decent distance away from the airport, 10 miles or so is reasonable, and type in your heading, altitude and speed in the boxes to the left of the map, and click OK. You'll start in a position for a good practice approach. You might want to save this flight as "Approach Practice", by hitting the semi-colon (;) key and following directions. You'll have it ready to go whenever you want.
I know that I may have left out some things in this tutorial and have perhaps oversimplified these procedures, but I'm trying to give you just a rough idea of what's going on, the "mini-tutorial" that I spoke of, if you will. I suggest taking the tutorials that are in MSFS 2004 also!
By the way, if you happen to see something absolutely, 100 percent wrong, let me know! If you have a question, visit the forum! For the most part though, I think I got all the square pegs in the round holes! Uh, wait a minute...
Keep your landings soft!

