


www.farmboyzimsflightsims.com
FBZFS
Click On Any Picture For A Larger View


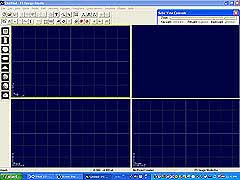
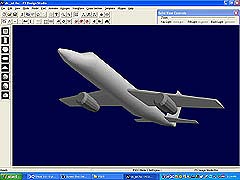
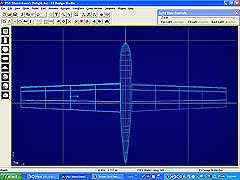
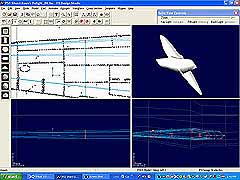
You start with a "blank palette", like the image in the upper right, and before long, what you'll be looking at is a creation that you've made, and you'll be able to, in a matter of moments, be in your model within MSFS 2004, trying out your new ride or sitting under that shade tree you just created! One user said that they should post a
warning that this utility can be addictive! I totally agree! What I'm going to do in this review is give you the lowdown on what FSDS v3 is all about, and then I'll talk you through a few shots of the beginnings of a plane creation that I am working on. My first project! For you folks that are already familiar with FSDS, most of this is "old hat" for you, but you may be interested in the additions that have been made with version 3, which will be listed later in the review. For you folks out there that have no idea how to make a plane or any other scenery object, I think you'll find this a very intriguing product that you shouldn't be intimidated with. The tutorial comes in a PDF format and is surprisingly easy to follow, with very little technical jargon.
FSDS v3 is a utility that allows the user to "see" what they are creating as they create it. The screen is divided into four fields; top, side, back, and a 3D view of your creation. Each of the fields can be expanded so that only the chosen field appears fully on the screen, making it easier to manipulate parts, cross sections, or points of an object. Various zoom levels are also employed to get a closer look at what you're working on.

They start you off with well written explanations of terms, tools, and options that are used with the utility, then you jump right in by making a simple water tower, after which you are shown how to easily place it within your flight sim files. You're going to hear the word "easy" quite a bit in this review, for I can't emphasize enough just how easy working with this utility is! By the way, it really is a water tower and not an atomic bomb blast! This exercise demonstrates how to make a one sided template, or outline, and "sweep it around an axis. In the case of the water tower, one half of the tower was outlined with a number of points, and then "sweeping" that outline around 360 degrees to make a solid object. Each of the tutorial exercises builds upon the last, so that you continue to build upon what you picked up from earlier exercises.
The second aircraft that you are guided in making is the Cessna Citation. Now we're starting to look like aircraft makers! Once again, past techniques are used in combination with new techniques and tools to create this model.
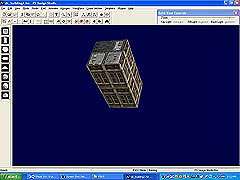
Yet another tutorial will guide you through the construction of a building, which literally takes just minutes to complete. A "primitive part" is chosen, which is nothing more than some basic shapes that are provided as a base shape for whatever you are making, i.e., box, cone, circle, etc. In the case of the building, a box was used with the dimensions set in an easily understood dialog box, and then textures were utilized for the sides and top of the building. It was explained in using textures, the processor won't have to work as hard to make the building appear correctly in your sim. This means better frame rates. Textures are simply pictures that are saved in a .bmp formant and then "pasted" to the object that you're working on.
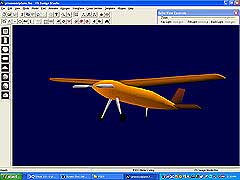
You may be wondering what these exercises have to do with making an aircraft. While these objects certainly aren’t made for flying, they do provide you the basics that will be needed in all the projects that you create. They give you a little at a time to digest, but I'll tell you what, after gobbling up one exercise worth of information, I was eager to go on and learn more! The learning process is actually quite fun. Before long, they have you making your first aircraft, which is called the "Pinewood Aircraft" since it resembles something out of those Boy Scout Pinewood Derby's events. It is a basic shape, which enables you to learn the steps in the construction of an aircraft model. It also shows you how to use the flight dynamics and panel from an aircraft that is already installed. In this case we used Patty Wagstaff's Extra model for ours. It was surprising to see this "aircraft fly, but it was also surprising just how easy it was!
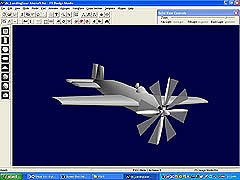
You also get project files that are ready made, showing you such things as prop animation. This is a good time to mention a little thing called the "wizard". There's an airfoil wizard to help in making wings, tails, elevators, etc., and there's also a utility to help make the animation of things such as props just downright easy! I told you I was going to be using that word often!
I've only touched on the things you can do with this great utility. You can be making just about anything you want in a matter of hours. Like any tool, the more you use it, the more you find out about it. In the case of shortcuts, they really don't have you use them too much at first, as they prefer you to learn from the ground up, and in the process of learning, short cuts can perhaps lead to confusion. As you gain experience though, and I'm talking about just a few hours, you'll figure out the key or toolbar shortcuts, which really speeds things
up! The amount of time it takes to create an aircraft is entirely up to you deciding on how much detail you want to put into it. With detail comes time. Abacus has done all they can to make it as easy as possible to create projects, doing a lot of the work for you behind the scenes.
Louis Sinclair, the inventor of FS Design Studio has added new and improved features to the most widely used design tool for Flight Simulator. Here's a partial list of the new features in the upgrade:
New Full FS2004 compatibility. Uses MakeMDL and BGLComp tools to provide complete FS2004 feature set
New Scenery compatible with FS2004 Libraries
New Boolean operations provide powerful way to cut and split parts.
New Animation capabilities as provided by the FS2004 documentation
New Support for using specialized textures: nighttime, lightmaps, more.
New Export to .x file format. For advanced users who want to "tweak" the .x file for MakeMDL.
New Unlimited Undo / Redo. Protects your model from inadvertent design errors. Roll back each design operation, step-by-step.
New User selectable Autosave interval. Safeguards your model from computer failure.
New FSDS V2 compatibility. New version recognizes and handles earlier file versions.
New Aircraft Specification Sheet simplifies setup of new aircraft for Flight Simulator
Updated Pre-Processes allow for conditional display of parts
Updated HELP files with tutorials for making animated scenery.
There are some aspects of this utility that I am still learning to use, but shouldn't take long to soak it up, since it's fun, fun, fun! I have yet to experiment with the Boolean operations, which is used for cutting out sections of the model such as wheel wells, windows, etc. I have read through the manual (this is one of those products where you really do have to read the manual!) and found that even though this was a very new subject for me, it was perfectly understandable after reading through the tutorials. I decided to get this review out before my "project" is totally complete, for I have been having way too much fun tweaking this and twisting that, trying for perfection and learning how to get there, or as close as I can at the same time!
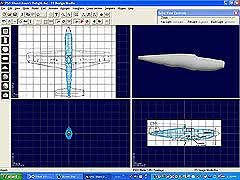
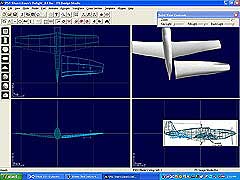
What I'm going to show you now is some of the steps that were taken in constructing my model of a P-51 Mustang named "Sherri Dawn's Delight".
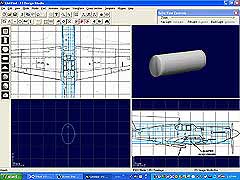

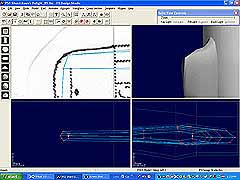
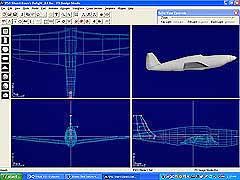
Selecting a tube for fuselage. Note the use of an imported background for ease of part placement. It can be toggled on or off.
"Scale Mode" used to resize cross sections of fuselage. X, Y, and Z axis' can be inhibited in combinations to restrict movement in chosen directions.
It's starting to actually look like a fuselage! Note the mini-toolbar in upper right of screen. This controls the various levels of lighting effects on your 3D model. Compare to other views in other screenshots.
"Wing Wizard" airfoil tool helped to create wings in a matter of minutes.
Shaping the wings took a bit more time, as I was still learning to manipulate parts, points, etc.
Getting the upswept angle of the wings just right. Swept back wings are easily created by entering desired degree of sweep in airfoil dialog box.
Maybe if I just move this point a bit more to the left...
A tail was added by using one that was made from an earlier tutorial. All that had to be done was resize it and shape it!
Making copies of the wings to use in finishing the tail section. again, all I had to do was a bit of resizing and shaping, and...
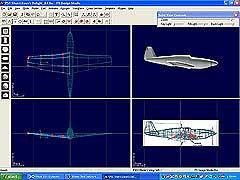
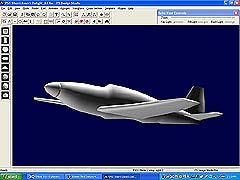
...the almost finished product! I still need to add the prop, do the Boolean thing (that sounds odd!) to cut out wheel wells and canopy, add some textures and load up some flight dynamics and she'll be done! Are these things ever truly done though? I suppose at some point you have to step back and say to yourself, "Enough! I'm going cross eyed!" It is easy to lose yourself in the work as you create these projects. As with anything that you may enjoy, time is of no consequence if you're having fun! Or at least I like to think so!
I promise, no matter what it looks like, I'll post my aircraft and another review of what it takes to cross the finish line within a few weeks! There's also a topic for Development in Farmboyzim's Forum, in other words, any tips are much appreciated!
I hope that I've sparked an interest in your creative side with this review! There's always room for more aircraft and scenery downloads, so if you ever liked making aircraft models, this is the ultimate in model making! Once again I want to say that it is not an impossibly boorish utility to learn and use. It's exactly the opposite! Its fun to learn and EASY too!
In learning the basics early on, the time spent was around an hour and a half to two hours. That gave me enough knowledge to get a project started. I like to think I'm a fast learner, but then, that's one opinion! Once I started the aircraft modeling to the point that you see here, took roughly 3 or 4 hours, give or take. I referenced back to earlier tutorials and exercises whenever I needed help, and kept the PDF open to use. Help is always easily accessible for whatever you are working on.
If you want to see some examples of what this utility can do, just look around out there in the world of downloads and keep your eye out for the letters FSDS, for I'm sure that you've downloaded some of these aircraft by now! You can also go to www.abacuspub.com, and check it out under the category, Flight Sim Packages. You'll also see some examples displayed on their site of what this wonderful utility can do.
I recommend this utility for anyone and everyone, young and old! With the all too easy tutorial format, anyone can be making aircraft and scenery to enjoy, and to offer it to other simmers to enjoy! You supply the time and the imagination! FSDSv3 goes for $49.00 USD for the downloadable version or $49.95 for the boxed version. It may seem like a chunk of change, and it is, but I can't think of a better way for a simmer to expand their horizons into the "development arena". You get a great product for the price, with which there is virtually no end to its creative power!
A quick note on utilizing other people's panels, dynamics, etc. The topic is covered regarding copyrights and such when putting these packages together, so if your intent is to sell your creations, make sure you have all the necessary permissions first! Don't step on any legal toes, they're oh so tender! Have fun creating the planes and scenery of your dreams!!!
Abacus Presents FSDS v3
Reviewed By Farmboyzim
Thanks For The Visit !
There are literally thousands of aircraft and scenery downloads out there that were made by folks with both a passion for aviation and creativity. In the case of the aircraft models, chances are pretty good that it was made with the utility FSDS, or Flight Sim Design Studio. The reason is simple. The folks at Abacus have made creating aircraft and scenery more than just fun, they've made it quite easy too! Version 3 of this extremely popular utility is out now with even more tools for making aircraft and scenery even easier than it already was.
