
Creating Your Own Airport
Part 2
By Farmboyzim
Welcome back to the second part of what could be an on-going tutorial series! The more I learn to pass on to you, the more I find that there IS to learn! Just one more thing that makes this one of the most popular hobbies in the world! The potential for expansion is perhaps limitless! When it comes to making or modifying airports or airfields, this is especially true. That's what we're going to do in this tutorial, modify the airfield that you created from the first tutorial.
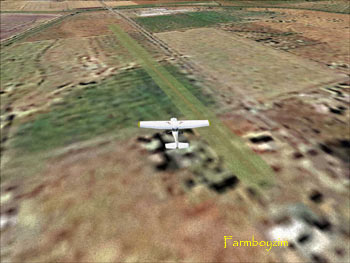
Flying over KZIM! The ground work is done! You'll see this airfield and yours evolve in short order!
Farmboyzim's Flight Sim's © Copyright 2005 All rights reserved. No reproduction in any manner may be made of content written by the author, without express, written permission of the author. All logos and trademarks on this site are property of the respective owners.
The comments made are property of their authors.
Use of this site constitutes agreement and consent to the Privacy Policy
It's important that you start out with the first tutorial, and then move on to this one, so click here to read the first tutorial (which will open as a seperate page) and I'll wait........ OK, here we go! That didn't take long!
Before we begin, I want to extend my Thanks to Lee Swordy (AFCAD Creator) and Derek Leung (FSSC) for creating and allowing the use of these great utilities in the making of our airfield!
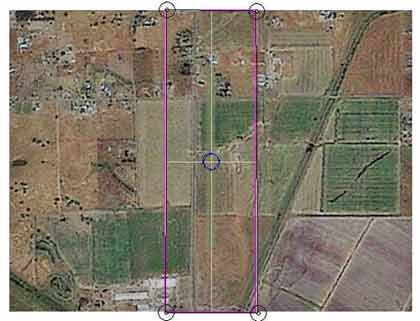
As you can see, what we have up to this point is a patch of level ground with a grass airstrip on it. Pretty basic! Since your creation of this airfield, you've won the "virtual" lotto, and now you want to spend some "virtual" bucks on it to make it more "habitable" (virtually, of course!).
What we're going to do is add some flat, grass areas for the plane to taxi on and will add some buildings, a tower, and an antenna tower. This is a real simple part of the airfield creation, and takes little time. Don't go crazy adding objects though!
You'll find it's easy to do! Going crazy with objects that is! Oh, and creating them too! Keep it as realistic as possible. The more objects added, the more your graphics card is going to work to render everything properly. This can be a problem on older, less powerful systems, but your average system these days should pack enough punch to see everything rendered nicely! So, all that said, let's get on with it!
Thanks For The Visit !
The first thing we're going to do is load up MSFS 2004 and go to your airfield that you've created thus far. Take a screen shot of your airfield from the top down view. Make sure that you get the entire field in the shot. Zoom in or out to do this.
Close out MSFS 2004. Save the screen shot background image to the FSSC folder or to a folder of your choosing.
Open Flight Sim Scenery Creator (FSSC) and open up your airfield file (File, Open, and KZIM).
Right click on your area and choose New Misc. Object, then Background Image. You'll see a dialog box like the one on the right (Fig. 1); only the info won't be present. Click the Browse button, and
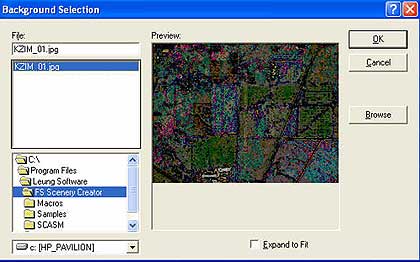
find your background image file in the browse box as shown below (Fig. 2). I saved my file in the FSSC Folder, and once I found that location in the bottom box, the file displayed in the upper box. Click on the file in the upper box and it will show you the image. Click OK.
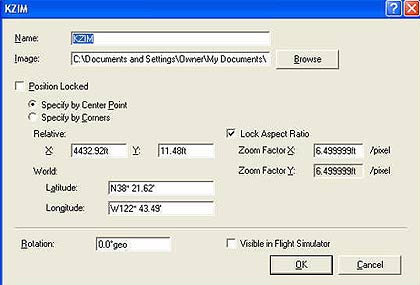
Once you click OK, up pops the background image that you snapped earlier. You'll notice that the size of the image, the runway to be specific, is probably not the same size as the FSSC runway image. To resize the background image to the proper size, right click on the blue circle in the middle of the background image, which opens up a menu. Choose Background Image Properties, and up pops the Properties box for the background image (Figure 1). In the box labeled zoom factor X, enter an appropriate number for the proper size image. I went with 6.5 feet per pixel, but the program rounds it up or down for reasons unknown to me. I went through a couple of size changes before I got it sized right, so experiment. There's no need to enter anything in the zoom factor Y box, just in the x factor.
Figure 1
Figure 2
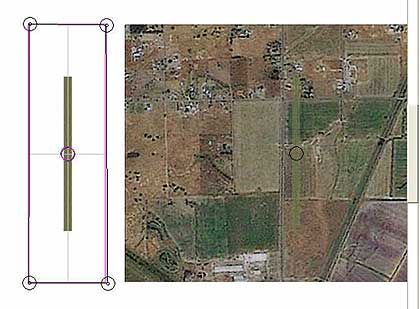
Now just "grab" the background image by left clicking and holding down, and drag the image onto the FSSC image. Just line up the center circles. Zoom in or out using the tool bar or keys to make centering easier.
Now we have an image that we can work from and relate to when we start placing our objects. This gives us a better idea of where to place everything and how it will look once finished. The background image is only for reference and does not get transferred over into your scenery folder.
Now get ready to have some fun, even more than you have already!
I'm going to start by putting in some well manicured grass around the airstrip, for the buildings to sit on, and for the "taxiways" shooting off the strip.
Start by right clicking inside your area and follow the menu to Polygon. Click on Polygon. Another pop up box is displayed, this time it deals with the area your going to create. You can choose any texture you like here by clicking in the Texture box (Fig. 6).
Yes, once again, you'll be shown a dialog box (Fig 7).
We'll use the textures that came with MSFS 2004 for this project. There's a world of Macro and texture downloads out there and you can even create your own, but that's a can of worms I just don't want to open just yet!
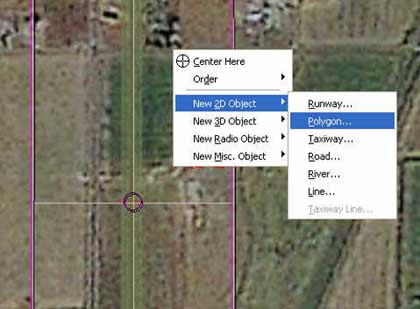
Figure 3
Figure 4
Figure 5
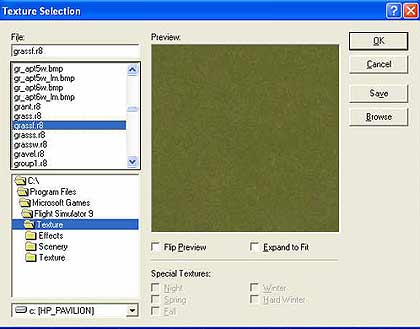
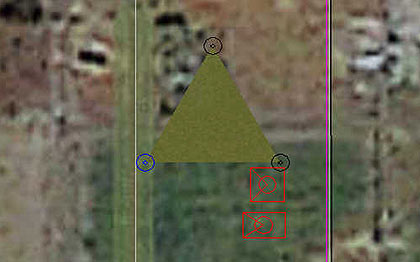
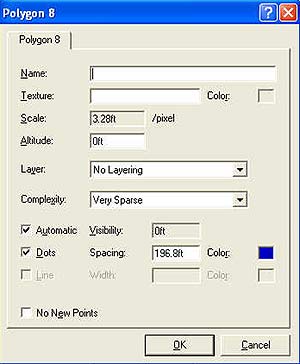
Figure 6
Figure 7
CLICK HERE
Navigate To the Flight Simulator 9 Folder as shown in Fig. 7. Click on Texture in the lower box and once you've done that, the upper box will display all sorts of various items. I went with grassf.r8. Choose whatever you like, even gravel, concrete, or asphalt if you so desire.
Once you've clicked on a texture in the upper box, it will give you a preview of what that particular texture will look like. Click OK.
After you click OK, a triangular grassy looking object with three circles at its points appears (Fig 8). This is the grassy area that you just selected. Click anywhere on the sides of this triangle to add more anchor points. Keeping things simple, I just added one more so that I could work with four sided shapes for the time being. Put your cursor over any anchor point and click and pull the grassy area into the shape that you desire. Do this as many times as
Figure 8
you like to make an area that is grassy for the buildings to sit on, and for the "taxiways" for the aircraft to follow. Just go through the same procedure of right clicking, 2D, Polygon, and it should still have the same grass file present each time you call up a polygon. Go ahead and experiment! There are no set patterns here, so design your own grassy areas, but remember to keep things practical and as realistic as possible. If you don't want something, just click on it to choose it and hit delete.
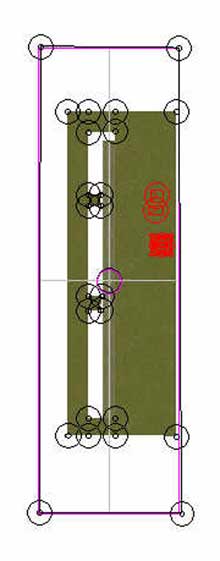
Figure 9
I pulled the background image away so that you can see the grassy areas that I've put in. The white strips are just where the bare ground will be, that’s in the default ground textures of MSFS 2004. We just didn't add anything to these areas. The red objects are the other objects that I've added. The order that you add things is entirely up to you. Whatever you find fits your particular designing style.
So let's add those objects. Right click in your area. Follow the menu as in Fig. 10 to Macro and click on it.

Figure 10
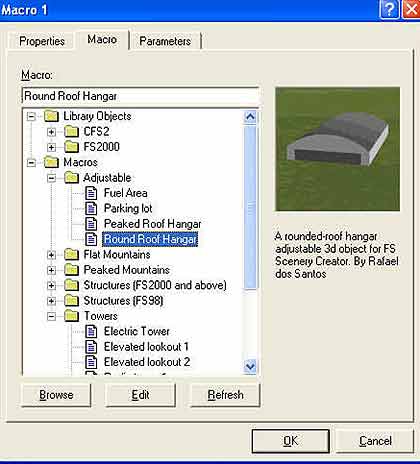
After clicking on the Macro selection, another one of those helpful dialog boxes appears (Fig. 11). I'm going to add a Round Roofed Hanger. So, follow the navigation as in Fig. 11 to the Round Roof hanger macro. Feel free to explore! There are quite a few objects in these files. Some are rather plain looking though, as is the hanger that I've chosen. So look around! When you find something you want to add, click on it, and then click on the Properties tab. Ha! Thought I was going to say OK, didn't you? There's more "stuff" that needs a bit of explaining. I'm going to cover the basics.
Figure 12 shows the Properties dialog box. There are just a few things here that we're going to fuss with. The first is the Name, which can be anything you want, i.e. "Main Hanger".
Next is the Rotation. This is the setting for the direction that the object will be facing. I'll have the front of my hanger facing 270 degrees. In Figure 8, the red rectangle is the hanger. The "V" shaped lines within the rectangle is an indication of which direction the object is facing. The open end of the "V" being the front of the object. Use common sense in facing your objects.
Figure 11
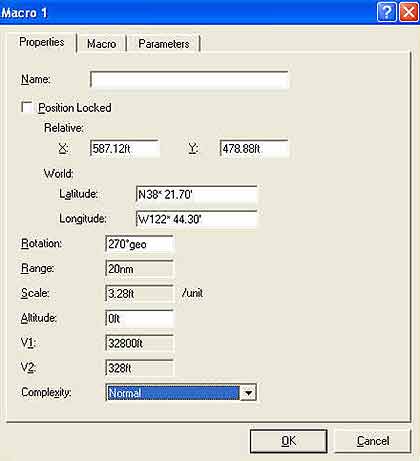
Figure 12
Main Hanger
The Range box deals with how far away from the object you'll be when you first see it. Once again, use common sense here. You wouldn't see a pile of crates from 20 miles out! You may consider changing it to one mile in the instance of the crates. For the hanger, I'm going to leave it at 20 nautical miles and see what happens. This is still probably a rather high setting. But what the heck! We're experimenting!
The next box of importance is the Complexity box. Remember making your display and other settings within MSFS 2004 and coming across the Autogen Settings? This is what determines what you'll see, depending on your system. Slower systems usually run the autogen settings around the normal or sparse ranges. You might consider giving things like the crates a setting of sparse, that way slower systems can see other objects of more important value, and still keep a good frame rate going.
I'm not going to go into much detail concerning the Parameters Tab, as this is going a bit out of the "basic" category that I'm sticking to. It deals with colors and texture selections. Again, we're going to stick with what they give us for the time being. So..... Click OK now, and ouila! There's your hanger, (the red rectangular box. It changes to blue when selected.). Just "grab" it with the cursor by
left clicking on it and holding down, and moving it to where you would like it placed. See now how handy that background image is? At this point, go ahead and add a few more of the basic objects. We'll get into NDB, VOR's and ADF's later. For now just stick to some of the other objects in the Macro category. Remember to keep it realistic for the time being though, and basic. You can create "Super Airports" in due time!
Once you think you have enough objects placed, go up to the tool bar at the top of the screen and click on File, then Export Scenery Wizard, and once more, one of those dialog boxes! But you're so very close now!
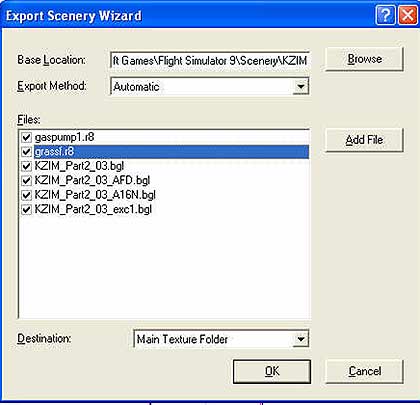
Figure 13
The Export Scenery Wizard, as shown in Fig. 13, makes life real easy for you here! Just make sure all the items are checked that you want exported into the Scenery Folder of MSFS 2004, and click OK. With a flurry of dark, technical looking screens that come and go in a flash, your new airfield has just been exported and is now ready for its Grand Opening!
Below (Figure 14) is a Top down view of my airfield so far. Next up, we'll explore the wonderful world of AFCAD, and put in some navigation beacons, designated taxiways, parking spots, and a whole lot more! We'll also cover in a bit more detail, third party add on macros, but if you can't wait, check
out Avsim and do a search for Scenery Macros. Try to stick with Macros that have been made for MSFS 2004. Some MSFS 2002 Macros may work, but they may also glitch up on you. Another excellent site is Frank's Hanger at www.flightsimsetc.dhs.org where you'll find so many downloads, it'll make your head spin like a prop! Just about all of the downloads have install instructions. Follow them and you shouldn't have any problems! Have fun!
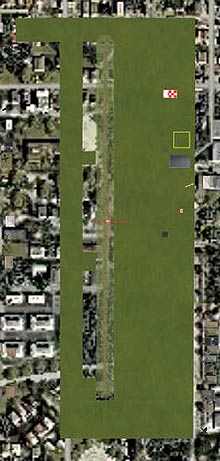
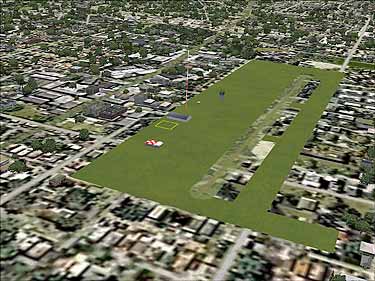
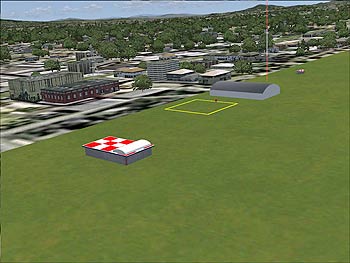
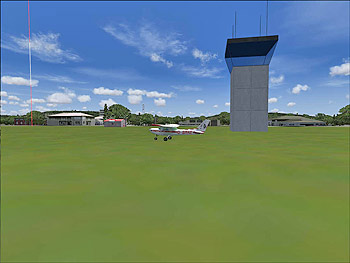
Figure 14

Farmboyzim's Flight Sim's
www.farmboyzimsflightsims.com

