Creating Your Own Airport
By Farmboyzim
Much to my pleasant surprise, creating my own personal, yet basic airport was not that difficult a task, and the best part about it all is that the utilities that you will need are all Freeware! So, before we get down to the nuts and bolts of the construction phase, let’s look at the two utilities that you're going to need:
AFCAD is a freeware CAD-style program that allows you to modify the facility data, and some of the visible scenery, used in Microsoft Flight Simulator (FS). The facility data that AFCAD works with is used by ATC to control user and AI aircraft at airports and to assign parking. It also controls the airport information that you see on the ‘map view’, GPS screen, flight planner, and start position set-up window in Flight Simulator. The visible scenery that AFCAD can modify includes runways, taxiways, aprons, and all associated markings and lights. More airport scenery elements will be added in subsequent releases. AFCAD © 2003 was created by Lee Swordy. Thanks for letting us use this great tool!
AFCAD2 can be downloaded HERE
The second utility needed for this project is going to be Flight Simulator Scenery Creator, created by Derek Leung. Flight Simulator Scenery Creator 1.5.11 is a simple, yet powerful, graphical editor that enables you to add additional scenery of your own design to Microsoft Flight Simulator. Features include support for FS2002 sceneries, an intuitive click-and-drag interface, and an extensive help system.
FSSC 1.5.11 can be downloaded HERE
I'm going to give you the basics of what you need to know about these utilities, and then turn you loose on your own! Within each of these files are excellent help instructions also. These are really quite easy to use tools, and can be explored and experimented with extensively on your own. You may want to sketch something out as to what you may want the field to look like, in general, but for the purpose of this tutorial, I just went with my imagination as the airfield progressed throughout its "construction". Here we go!
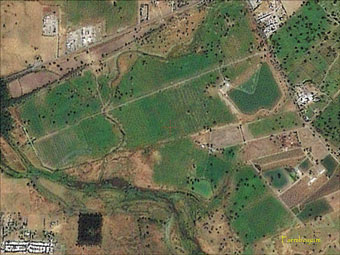
Fire up MSFS 2004, jump into a small, General Aviation aircraft, such as the Cessna 172 or similar aircraft, and fly around an area where you would like to "build" yourself an airfield. Keep in mind that we are going to keep this first one simple, so cruise around in the country somewhere and find yourself a nice big field, or beside your favorite lake. In the figure at right is the location that I chose for my first attempt at "building" a strip.
Once you have a location spotted, go to the "top down" view (right click on the screen, not the panel, and choose Top Down View). You'll also want to hit the shift + z key to bring up some handy info like coordinates in latitude and longitude, speed, heading, etc. We're concerned with the lat. and long. figures here. Go into "slew" mode by hitting your "y" key. Now, slew your aircraft over to where you want the airfield to be. Use your Number Pad or yoke to slew to the area. Once you're over the spot, we need to know not only the lat and long coordinates, which are displayed at the top of your screen, but we also have to have the elevation of the field. So now that you are over the spot where you want the field to be, and you're still in slew mode, hit the F1 key to move down rapidly, or the "A" key to move down slowly, all the way to the surface. Don't worry; you won't crash while in slew mode.
Now here's where the info at the top of your screen comes in. Write down the latitude and longitude coordinates and make a note of the elevation where you have parked the plane as we'll need this information later. Exit Flight Simulator and start the AFCAD program that you have downloaded and installed.
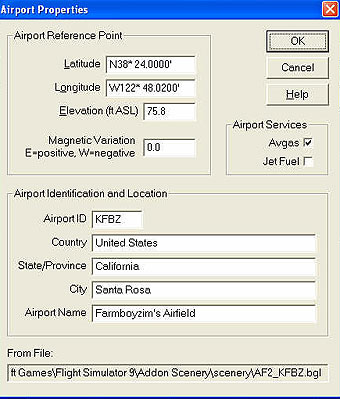
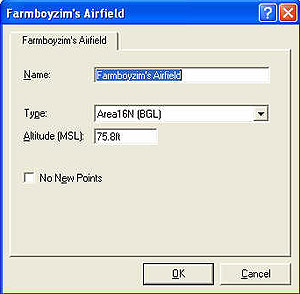
Once you have the program opened, go to File, and then click New Airport. A dialogue box like the one at the left will appear. Fill in the information that is asked for. Leave the magnetic variation as is. I chose Avgas in the Airport Services block also. When entering your Airport ID, make sure that it is not already being used in MSFS.
After filling in the necessary info in the boxes click OK and save your file. Name it whatever you like. I named mine after its identifier, KFBZ. What has just happened is that AFCAD has saved this information to MSFS 2004, and you will find your airport listed in the "select an airport" box when creating a flight. Close AFCAD for now. Don't go hopping into your plane just yet! All we've done so far is add the location and name info to MSFS. Here's where all the fun begins!
Before we open up Flight Sim Scenery Creator, it is recommended that you download the updated SCASM (Scenery Assembler) file and replace the scasm.exe file that will be found in the SCASM Folder of FS Scenery Creator. Just download it, unzip, and do the switch. This is going to prevent crashes and lock-ups. Download SCASM 2.96.
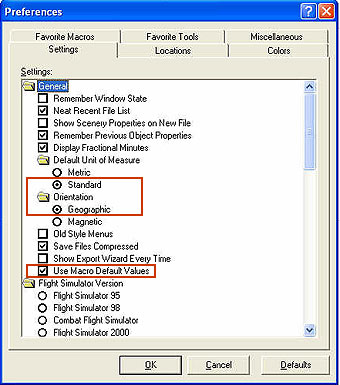
After you've done the above replacement, open up FSSC, then on the tool bar open Tools, then Properties. In this box, check "Standard" for the unit of measurement, "Geographic" under Orientation, and select Use Macro Default Values.
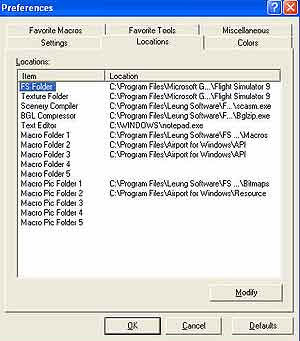
Let's make sure now that all the destination paths are correct. The FS Folder should read: \Flight Simulator 9.
The Texture Folder should read: \Flight Simulator 9\Texture.
Last but not least, your Macro Folder 1 should read:
\FS Scenery Creator\Macros. FSSC may try to write the scenery files to FS2002 if you do not follow this step.
Leave everything else as it is. Refer to the figure to the left.
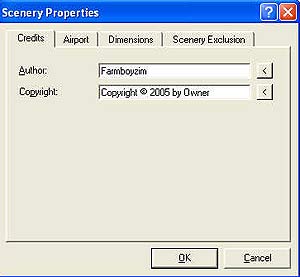
OK, so far so good! Now let’s fill in some Scenery Property Details. On the tool bar, open Edit, and then open Scenery Properties. Here we have some more blocks to fill in. In the Credits, fill in your name (See figure at right).
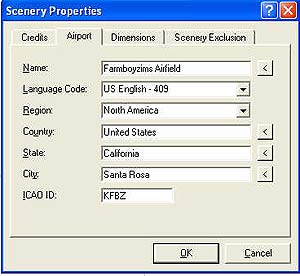
Next, open the Airport Tab and fill in the info there. This is a repeat of the information that you already entered into the AFCAD program (remember I told you to save your notes!). Refer to the figure at left.
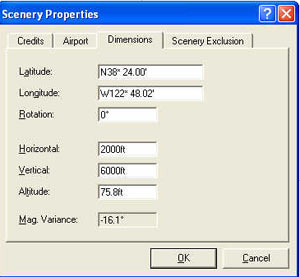
Open the Dimensions tab next, and fill in the latitude and longitude information from your notes, leave the Rotation at 0 degrees so later alignment will be easier. Now we need to fill in some dimensions. These are not the runway dimensions; they are the scenery area dimensions within which your runway will be located. Horizontal refers to how wide the area is going to be and vertical is how long the area is to be. I wanted lots of room, for my planned runway length is going to be 4000 feet by 150 feet, so dimension your area accordingly. Allow for room at the ends of the runway and enough room to the sides for buildings, shops, etc. Magnetic Variance is set automatically.
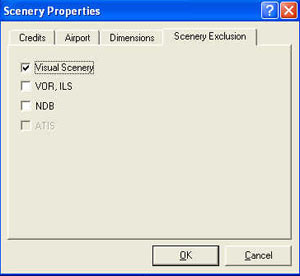
This one's short and sweet. Under the Scenery Exclusion tab, check Visual Scenery. This removes trees and other obstacles from the area where we are building. See figure at left. Click OK and this returns us to the design template in FSSC.
On the template screen you will now see the scenery area outlined. What we need to do now is make sure the area is flat so that we may have a decent area in which to build our airfield.
Right click in your area and you will see lots of options listed. The only one we want right now is "Flat Area". Click "Flat Area" and another dialogue box appears. (See figure at left). Just enter a name; it can be "Flat Area 1" or whatever. Leave "Type" alone, and enter the elevation of the airfield in the appropriate box. Click OK. Initially what you will see is a triangle with three circular points. Add a fourth point by clicking on any of the triangle lines.
Now to shape the "flat area", left click and hold on the circular points and drag them into the shape that you want flattened. I went ahead and "flattened" the entire scenery area within its boundaries.
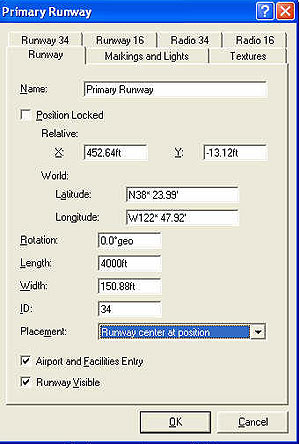
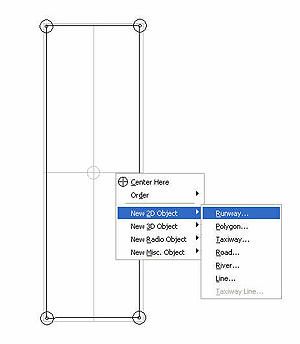
Something's missing here. Hmmm... Oh yeah! A runway! Right click in your area to bring up all those options we talked about earlier, and click on "Runway". Yes, another box shows up! Most of these boxes are already filled in or are not used for our project. Name your runway, and enter the length and width of your airstrip. See figure below. Take a peek at the other tabs and make sure everything is unchecked, for we are constructing a simple airstrip in this project, not KSFO!
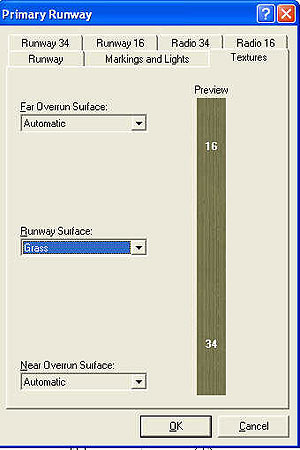
We're going to make a simple grass strip, so in the "Textures" tab, choose "Grass" and leave everything else alone.
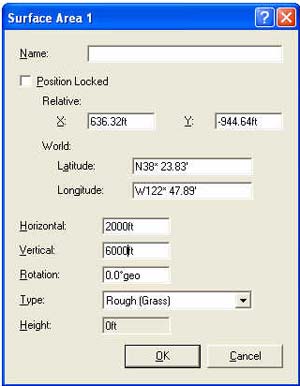
We will want to create an area around our grass strip that will reflect the type of ground that we have built our airstrip on. Right click on the screen and in the list of options scroll down to "Misc. Area" and select "Surface Area". Enter the name of the area covered (can be any name you wish), dimensions of the area that you want covered, and choose Rough (Grass). this enables the sim to imitate the action you would have while taxiing over rough grass. Click OK.
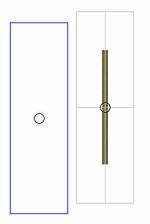

Right after you click OK in the Surface Area 1 box, what you're going to see is something like the figure below on the left. Click and hold in the center circle of the pink box and center it over your scenery area, as shown in the lower right figure.
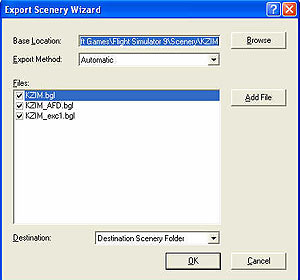
All that's left now to do is save your file up in the tool bar under "File", and then we need to export it into our simulator. In the tool bar select "Export Scenery Wizard", make sure the files have check marks, leave everything else alone, and hit OK. Whoosh! Your airfield is now part of your scenery files in MSFS2004. Open up MSFS2004, go to create a flight, choose the area in the state and city that you constructed in, and you should see the name of your airfield! That's that! Go check it out!
Next edition of this tutorial, we are going to experiment by adding some objects, and maybe even resurface the airport area!
To make it easier on you, you have my permission to copy and paste the text of this document into Word or other program and print it out for your personal use only. Ok, you can share it with a friend, but if you want to republish this, just ask me for permission first. Thanks!
I hope this was helpful in getting you started on your way to creating your own custom airfields and airports sceneries! Remember that these are the very basics just to get you started. There's a world out there to create, so get started!
FBZ
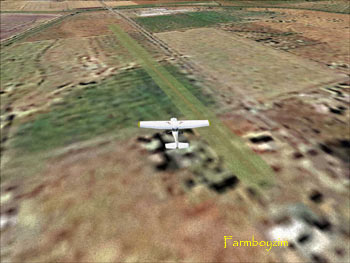
Flying over KFBZ! The ground work is done! You'll see this airfield and yours evolve in short order!
Farmboyzim's Flight Sim's © Copyright 2005 All rights reserved. No reproduction in any manner may be made of content written by the author, without express, written permission of the author. All logos and trademarks on this site are property of the respective owners.
The comments made are property of their authors.
Use of this site constitutes agreement and consent to the Privacy Policy
My Thanks to Lee Swordy (AFCAD Creator) and Derek Leung (FSSC) for creating and allowing the use of these great utilities!
Thanks For The Visit !


Farmboyzim's Flight Sim's
www.farmboyzimsflightsims.com