

www.farmboyzimsflightsims.com
FBZFS

Thanks For The Visit !
It's time to delve into that land called aircraft textures, as in paint jobs! Here's a simple (I hope!) tutorial on how to add various liveries to your favorite aircraft models.
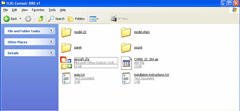
Fig. 1
The Convair 880 in Delta Airlines Livery
The Convair 880 in Delta Airlines Livery
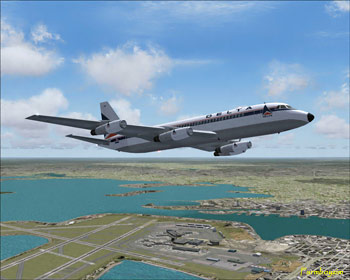
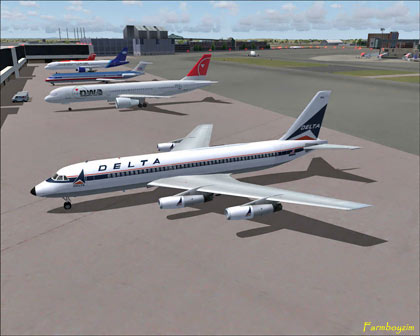
Fig. 2
She's a beauty even sitting next to the "youngsters"!
She's a beauty even sitting next to the "youngsters"!
It seems to me, that there are many times more Livery Textures out there than there are aircraft models. In my daily Library updates from Avsim, the list is usually the longest for these repaints, another name for the aircraft texture. This is absolutely fantastic, as it gives us simmers so many choices of what to slap onto our models, that at times it can be overwhelming. Especially if you are a "download addict" (recovering DL addict here!). The choices range from real world paint jobs, like Delta, TWA, United, Lufthansa, British Airways, etc., and there are just as many fictional or custom paints out there as well.
More than likely, you'll find something that will catch your eye, and you'll want to have it. You'll download the file for the repaint, and if you are unaware of what you are getting, you may be surprised that there is no aircraft model included. All that you will find in an aircraft repaint (I'm going to call them repaints from here on out to keep it simple) folder is some files with .bmp, readme.txt, and perhaps a credits document. There are times, however, when folks will do a repaint, and with the original author of the model's permission, will upload the entire model, aircraft and repaint combined.
What I'm going to show you how to do will be to take a repaint, with no aircraft model included, and apply it to the...and here's the important part...original aircraft model file that you have already downloaded and loaded up into MSFS2004. The instructions in this tutorial are for the Convair 880, developed by Hideki Hashimoto, Dee Waldron, and Marc Hookerman. It's an outstanding model to use as an example, and it has loads of repaints in various schemes for you to use as well. I'll tell you where to go at the end of the tutorial to get the aircraft and repaints. Time to focus on our task at hand now!
What I'm going to show you how to do will be to take a repaint, with no aircraft model included, and apply it to the...and here's the important part...original aircraft model file that you have already downloaded and loaded up into MSFS2004. The instructions in this tutorial are for the Convair 880, developed by Hideki Hashimoto, Dee Waldron, and Marc Hookerman. It's an outstanding model to use as an example, and it has loads of repaints in various schemes for you to use as well. I'll tell you where to go at the end of the tutorial to get the aircraft and repaints. Time to focus on our task at hand now!
If you have never set foot into the folder of an aircraft model, it can seem a bit daunting at first. There are files such as panel, sound, .air, .txt, and other such monsters. The only file that we are going to concern ourselves with is a file called aircraft.cfg. This is the aircraft configuration file and holds the meat and potato's of what makes the model tick. So, where is this file at you may ask. Good question!
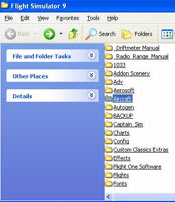
The default location that most people load MSFS 2004 into is C/Programs/Microsoft Games. We are going to go a little deeper into the pit. The full route to the Aircraft Folder, where our business resides, is C/Programs/Microsoft Games/Flight Simulator 9/Aircraft. The "Aircraft" folder is where we want to look for the model that we want to add our livery to.
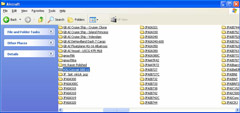
In the case of this tutorial, the name of the aircraft folder is HJG Convair 880 v1. Open that folder and what you will see will be similar to that in Fig. 3 above.
What I like to do is get everything open on the desktop and ready to go, so here's what I do next.
What I like to do is get everything open on the desktop and ready to go, so here's what I do next.
Fig. 3
Inside the aircraft model folder
Inside the aircraft model folder
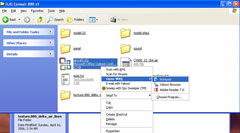
Fig. 4
The Aircraft folder within the Flight Simulation 9 folder
The Aircraft folder within the Flight Simulation 9 folder
Fig. 5
Locate the model you're going to add the repaint to.
Locate the model you're going to add the repaint to.
Within the models folder is the file that I mentioned earlier, the "aircraft.cfg" file. Open this file by right clicking and using Notepad or other text editing tool. Notepad is there and most have it and use it as it works just fine. Once this is open, I resize the just opened window so it doesn't take up my entire desktop. Shove it over to the side of the desktop for now.
Fig. 6
Open the "aircraft.cfg" file.
Open the "aircraft.cfg" file.
Fig. 7
"aircraft.cfg" file opened.
"aircraft.cfg" file opened.
Don't do anything with it for now; we'll be back to it shortly. Leave your aircraft folder open as well, and do the same with it. BTW, you can either resize and move the windows, or just minimize, whatever you prefer and is easiest for you.
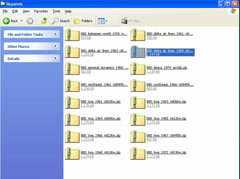
Fig. 8
My folder full of Convair 880 repaints.
My folder full of Convair 880 repaints.
Next, go to the folder where you downloaded the zip file with the repaint in it. I had a folder called "Repaints", easy choice, easy to find.
Unzip the file that holds the repaint of your choosing to a temporary folder, as you won't need to save any of this "stuff" after the aircraft has received its new livery. For this tutorial, I chose the 1969 Delta Airlines livery.
Unzip the file that holds the repaint of your choosing to a temporary folder, as you won't need to save any of this "stuff" after the aircraft has received its new livery. For this tutorial, I chose the 1969 Delta Airlines livery.
Repaint files are usually very similar in content, but some things may be named or placed differently. Don't panic, no big deal. The first thing you need to do before you start copying and pasting, is find and read the instruction/installation text. Here you'll find information about the livery, the repainter, and how to get your bird a new skin. You'll also see some text that really doesn't read very well, as this is the texture data. In the case of this model, the instructions tell us to copy and paste the text that is found in the "add to aircraft.txt" file into the aircraft.cfg file that sitting off to the side of the desktop. Remember putting it there? Exactly where to paste it is important.
Fig. 11
Copy the texture folder from the zipfile...
Copy the texture folder from the zipfile...
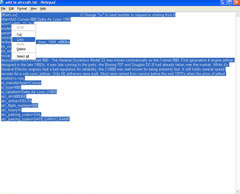
Fig. 9
Text to add to the aircraft.cfg file.
Text to add to the aircraft.cfg file.
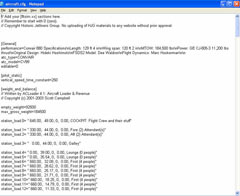
Fig. 10
aircraft.cfg file before changes.
aircraft.cfg file before changes.
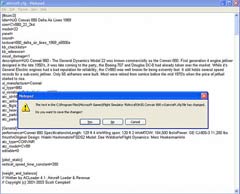
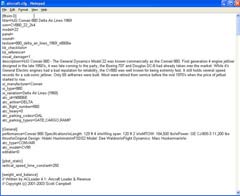
Fig. 10
aircraft.cfg file after new livery information has been pasted in.
aircraft.cfg file after new livery information has been pasted in.
Fig. 10
Click yes to save changes when you close the window.
Click yes to save changes when you close the window.
With most models, there will already be livery information in place within the file. This information is usually at the beginning of the text and starts with [fltsim.xx]. The "xx" denoting the number of the livery, i.e., 00, 01, 02, 03, etc. Always in order, with each new livery that you add taking the next available number. You can number them 1, 2, 3, etc., just as long as they are in order. You need to type this number in. With this particular model, there were no inherent paints, just the model, panel, sound, and other files to make her fly. No problem. As you can see in Fig. 10, it is telling you exactly where to paste the information that you just copied. Just highlight over the "//Add your [fltsim.xx].......without prior approval." and paste the livery info in its place. Since this is the first livery installed for this model, the "[fltsim.xx]" will read [fltsim.01]. Close the window if that's all the liveries that you'll be installing for now, and click yes to save the changes.
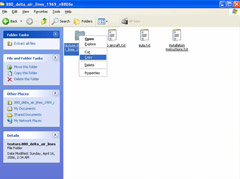
Let’s pop back over to the folder that holds the new livery, and locate a folder, in this case called "texture.880_delta_air_lines_1969_n8806e", right click and copy this folder, and paste it over in the Convair 880 aircraft folder. That's it! You've just installed a new livery for an aircraft!
It is the same procedure for just about all other models as well, but always find and read the installation file. It holds all the information you need to know, and more often than not, will tell you exactly how to install the repaint. Just without all the neat screen shots and images you find here at FBZ's! Have fun!!!
It is the same procedure for just about all other models as well, but always find and read the installation file. It holds all the information you need to know, and more often than not, will tell you exactly how to install the repaint. Just without all the neat screen shots and images you find here at FBZ's! Have fun!!!
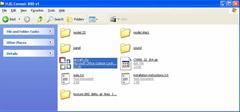
Fig. 12
...and paste it in the aircraft's folder.
...and paste it in the aircraft's folder.


How To Install Repaint Textures
By Farmboyzim
By Farmboyzim
If you have any suggestions or if you see something that I may have left out,
give me a holler in the forum!
Click Here to visit Farmboyzim's Forums, and if you're not registered,
climb on board!
give me a holler in the forum!
Click Here to visit Farmboyzim's Forums, and if you're not registered,
climb on board!