

www.farmboyzimsflightsims.com
FBZFS
Click On Any Picture For A Larger View

Thanks For The Visit !
The product comes as a download or on a disc. I received the download version and it installed with no problems. After purchasing the product, you will be emailed an access registration key to download the product. All very simple and quick. $29.00 US will get the download version onto your computer, $29.95 for the disc, and if you are an existing user of FSRepaint version 1, the upgrade will run you $17.50 US. For the ease of use alone, this product is worth the price, let alone the unlimited amount of repaints that can be created. After installation of FSR, you will need to set it up properly to get the most out of the utility. For example, if you happen to have any other utilities, such as Photoshop, as I do, you can use that utility to do the actual repainting of the model. So why bother getting FSR if you're going to use Photoshop, or some other utility? Because it does the "administrative" work for you. Remember the creation of texture files and altering the aircraft.cfg file? FSR does this for you with a few clicks, and acts as a liaison to your other utility.
creating a texture folder for the new paint, as well as adding the necessary information into the aircraft.cfg file (see my tutorial on adding liveries to an aircraft).
I have been having WAY too much fun with an easy to use utility called FSRepaint. This rather addicting little piece of software was developed by Jorge Santoro and Marco Paulo da Silva of Direct Solutions, Ltda., along with the folks at Abacus Software. FSRepaint is nothing new, and has been around since 2003. So why review an "old" product, you may ask? One good reason is it's a first for me, and secondly, it's fun and worth telling others about!
Often I had wanted to jump into the repainting arena, but I felt that I had enough "hobbies" on the burner for the present time. However, in the back of my mind, behind the cobwebs, I held onto the notion of someday learning the fine art of repainting. That day came with the download of FSRepaint. Within an hour, I had my first repaint of an aircraft finished. Granted, it is no prize winner, but within a very short time, I had learned the basics and "customized" my first aircraft! I was extremely surprised and delighted at how this utility saved time and effort in the creation of new texture files for an aircraft.
Reading through tutorials that I found on the internet on the fine art of repainting aircraft, I learned one thing for sure...everyone has there own styles and methods, although the basics remain the basics. FSRepaint automatically performs tasks such as

Double click to edit
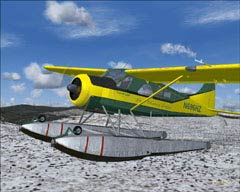
One of my creations
Creating a duplicate texture set from an exisiting model.
There's the new texture set "FBZ 01",
ready for repainting!
ready for repainting!
There is a process that needs to be done as well if you are not using FSR, and that's converting textures into the proper formats for repainting. I'm not going into the techniques and tools used to do this manually, since that's not what this article is about. Just consider it another step that is automatically taken care of by FSR. With other utilities, after modifications in both files and textures have been made, you would have to go in and start up FS, load the aircraft, and view the progress of work on your aircraft. "What you see is what you get" is a phrase that I remember from the sixties, and it had absolutely nothing to do with computers or graphics! Today, the "WYSIWYG" technology within FSR enables you to see the results of your work immediately. If you have two monitors, this is invaluable, especially if the textures you are looking at are confusing in their layout. If you don't know what it is you are looking at, put a spot of paint on the texture and see where it appears on the model! It is a great reference tool for use while working. So, let's look at a few of the steps that are required to alter a paint or create a new one...
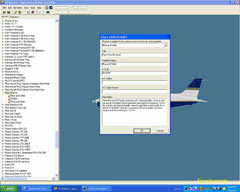
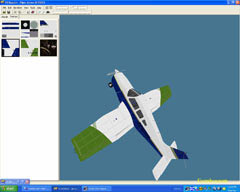
In the images above, you can see that the screen is divided into a couple of areas. Menu bar, a listing of all the aircraft that are loaded into MSFS, and the work screen, where you see the model of the aircraft in a 3D and rotatable view. The view can also be zoomed in or out, and lighting aspects altered and adjusted. The work screen can also be split into 1, 3, or 4 views, giving you excellent views of the aircraft as you work on it. I want to point out here, that when starting FSR, the load time will depend on how many aircraft you have loaded up into MSFS. I have a "few", as you can see by the partial view of the list in the images. I have enough time to grab a cup of coffee, stir the sugar in and sit back down, with a couple of sips to spare, before the list is loaded for me! Fewer aircraft means quicker load times. I'm patient so no issue here!
Once loaded, select the aircraft that you would like to repaint, right click on the model name, not the variation, and click "Create a new variation". This brings up some information that needs to be filled in. This is the information that you see in MSFS when you are selecting an aircraft. Choose a variation that you want to use as base textures, and a couple of clicks later, you have a new variation created. It is identical to the one that you based it on, but now you can make chances to it, without changing the original. I think this is a wise way to go. Here's a quick hint...when I make a new variation, I usually call it "MASTER", make changes, such as erasing registration numbers, decals, etc., and then save it. What I'm doing is making my own "master template" to use for future paints, so that I won't have to go in and make the basic changes time and time again. This is something I learned as I painted. You'll find yourself remembering little things like this that will save time and effort for future projects.

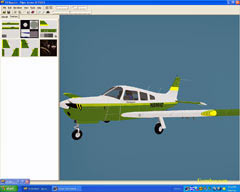
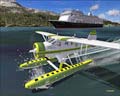
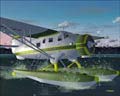
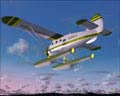
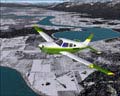
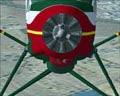
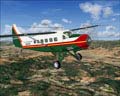
Once I had my "master" repainted and saved, I would create another variation, based on that saved master, and start repainting on that texture, thus, not mucking up the original or the master. There is a help manual within the program that can be accessed, and it's not too complex. It talks you through a repaint in an easy and understandable way. I found there were some things that were not covered in the Help Manual, such as how to create a custom palette of colors to use, but after a one-time, quick read through of the information, I not only had a pretty good idea of how to use the utility, but I had a better understanding of what makes up these "paint jobs", and the amount of work that goes into them. FSRepaint makes it easy to create liveries, but to make detailed, quality paints, time is required. This may be something that some simmers don't realize, but some of these repaints take hours and hours to complete. You can, however, have a unique, repainted version of your favorite aircraft within a very short time, depending on just how much you want to change and how detailed you want to get. In the three images above, I repainted a Piper Arrow III. All I really did was change the existing colors of the original paint job, to my own choice of colors, and added my own registration number. I believe this was the third model that I repainted, and it took me all of 30 minutes to complete! I will point out that the green color I used is not one that you will find on the palette of colors available for use. I went to another aircraft model, chose a variation that had this green in it, used the "eyedropper" to copy the color, then returned to the Piper variation, and used the "fill" tool to fill in areas with that green. The colors that are included by default are OK, but the palette is lacking in some of the colors and hues that I personally like, green among them. This can be worked around however.
FSRepaint has the basic tools to get the job done, and the user interface is very easy to interpret. FSR does not include some of the more advanced tools such as a blurring tool, which is handy to soften those jagged edges. I utilize both FSR and Photoshop. I lay down the basic groundwork and design with FSR, since it is easy to see what your work is going to look like, and then for the finishing touches, and armed with a better selection of colors, I utilize Photoshop. The combination of the two is great and compliments each other in an excellent manner. What one does not do, the other will! The "WYSIWYG" ability is again, invaluable in the creation of paint designs, and saves an incredible amount of time and guesswork. The manual will specify just what programs are compatible with FSR.
I had the program crash a couple of times in the early days of using it, loosing the work that I had done. This was due to clicking on the wrong menu item instead of "undo". "Invert Image" sits close by and I clicked it by mistake, thus causing the crash. No big deal, except for the lost work! My fault as far as I can figure, so I take my time now when clicking on menu items. Quick tip here...save your work often!
I would like to have seen a bit more information on some of the options of FSR, i.e. creating new color palates, etc., but the manual did do a good job of getting the basics across. The program is very user friendly, and you will discover new techniques and methods as you go. You could almost self-teach yourself to use this program, it's that simple.
I will be starting a Topic in my forum for repainting, and will include tips and tricks that I have learned along the way, and I hope others will contribute as well. I am by no means an expert in this field, but I am continuing to learn, and I'd like to think I'm getting better at it! ;-) I encourage any of you simmers out there with a desire for the artistic side of Flight Simulation, to check out FSRepaint. You will be surprised at just how fast you can learn to make custom paints for you and others to enjoy. Repaints are probably one of the most uploaded files on flightsim sites, and I would bet that a good portion of them are using, or have gotten their start with FSRepaint.
I have been creating one repaint after another since getting this utility, and often will find myself losing track of time, as I'm detailing some aircraft out! It's quite easy to get immersed into this tool! Not everyone has an artistic eye, and not everyone has the desire to do repaints of aircraft. For those with no desire, well, it's obvious...don't buy it! But for those of you that are border line artistic, or even if you can't draw a circle, you may just find that you can use a mouse to click colors onto a plane! If you have even a small amount of desire for this art, get FSRepaint before you go out and get a program like Photoshop or Paintshop Pro. It's a bit cheaper and a whole lot easier to learn to use! It will open up the doors of repainting as well, and educate you as to what's going on inside all those aircraft files. You can't help but learn as you go! If you are a pro at repainting, you may already have FSRepaint, and if not, you may find it a handy addition to your repainting "tool chest".
For more information on FSRepaint, visit www.abacuspub.com.
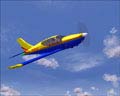
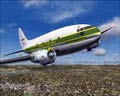
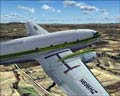
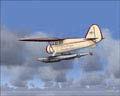
I'm off to do some painting now, so here are some shots of aircraft that I gave my personal touch to. Will it ever stop??????? ;-)
FSRepaint has the basic tools to get the job done, and the user interface is very easy to interpret. FSR does not include some of the more advanced tools such as a blurring tool, which is handy to soften those jagged edges. I utilize both FSR and Photoshop. I lay down the basic groundwork and design with FSR, since it is easy to see what your work is going to look like, and then for the finishing touches, and armed with a better selection of colors, I utilize Photoshop. The combination of the two is great and compliments each other in an excellent manner. What one does not do, the other will! The "WYSIWYG" ability is again, invaluable in the creation of paint designs, and saves an incredible amount of time and guesswork. The manual will specify just what programs are compatible with FSR.
I had the program crash a couple of times in the early days of using it, loosing the work that I had done. This was due to clicking on the wrong menu item instead of "undo". "Invert Image" sits close by and I clicked it by mistake, thus causing the crash. No big deal, except for the lost work! My fault as far as I can figure, so I take my time now when clicking on menu items. Quick tip here...save your work often!
I would like to have seen a bit more information on some of the options of FSR, i.e. creating new color palates, etc., but the manual did do a good job of getting the basics across. The program is very user friendly, and you will discover new techniques and methods as you go. You could almost self-teach yourself to use this program, it's that simple.
I will be starting a Topic in my forum for repainting, and will include tips and tricks that I have learned along the way, and I hope others will contribute as well. I am by no means an expert in this field, but I am continuing to learn, and I'd like to think I'm getting better at it! ;-) I encourage any of you simmers out there with a desire for the artistic side of Flight Simulation, to check out FSRepaint. You will be surprised at just how fast you can learn to make custom paints for you and others to enjoy. Repaints are probably one of the most uploaded files on flightsim sites, and I would bet that a good portion of them are using, or have gotten their start with FSRepaint.
I have been creating one repaint after another since getting this utility, and often will find myself losing track of time, as I'm detailing some aircraft out! It's quite easy to get immersed into this tool! Not everyone has an artistic eye, and not everyone has the desire to do repaints of aircraft. For those with no desire, well, it's obvious...don't buy it! But for those of you that are border line artistic, or even if you can't draw a circle, you may just find that you can use a mouse to click colors onto a plane! If you have even a small amount of desire for this art, get FSRepaint before you go out and get a program like Photoshop or Paintshop Pro. It's a bit cheaper and a whole lot easier to learn to use! It will open up the doors of repainting as well, and educate you as to what's going on inside all those aircraft files. You can't help but learn as you go! If you are a pro at repainting, you may already have FSRepaint, and if not, you may find it a handy addition to your repainting "tool chest".
For more information on FSRepaint, visit www.abacuspub.com.
I'm off to do some painting now, so here are some shots of aircraft that I gave my personal touch to. Will it ever stop??????? ;-)
Clicking on the thumbnails on the left, brings up those textures for repainting.
Wing and elevator textures.
With a few clicks and some new colors, my own, personal Piper is created!


FSRepaint by Abacus
Reviewed by Farmboyzim
Reviewed by Farmboyzim